Web Proxy Server in Net Control 2 is a part of Internet Control Engine, the subsystem that prevents access of students to undesirable websites. Web Proxy Server is included in Net Control 2 Classroom and Professional editions.
In order to use the Proxy Server Mode, it should be enabled both in the teacher console, and in the student module settings.
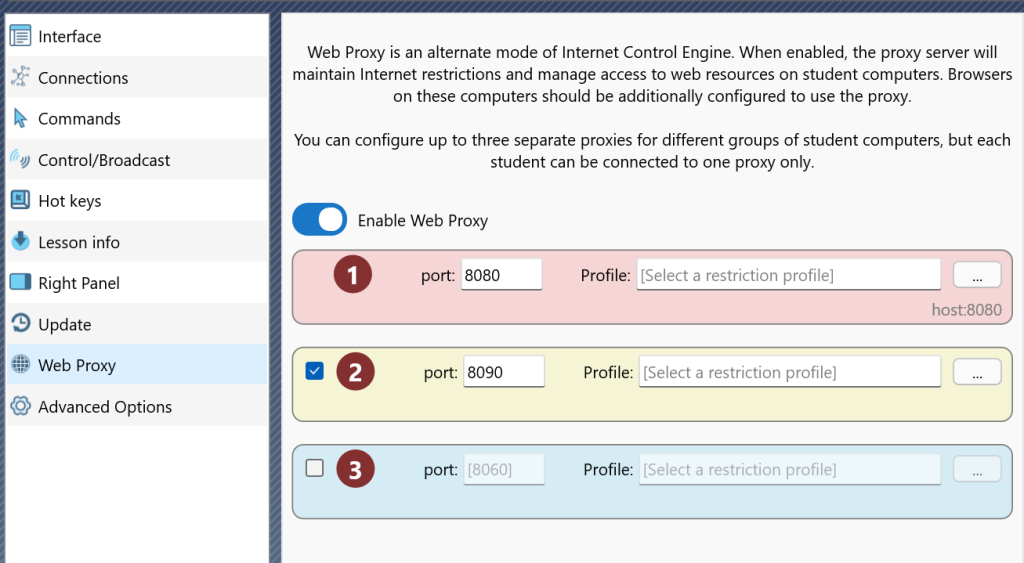
Net Control 2 Web Proxy Server supports three separate ports, making possible assigning different restrictions to different sets of student computers. Each port can be assigned with its own restriction profile (a set of forbidden or allowed websites), and each student can be connected only to one proxy server port.
- To enable the mode in the teacher console, please click the main menu command N – Options – Options; on the Web Proxy page, enable the Enable Web Proxy option, then specify network ports that should be dedicated to the proxy server. We recommend values in the range 4096..49151. By default the teacher module uses ports 8080, 8090 and 8060:

On this page you can assign a restriction profile to each port. This can be also done later using the Restrictions tool.
2. You need to enable the Proxy Server mode (Mode 4) in the student module settings:
In the teacher console please select student computers, select the main menu command N – Options – Client Options, on the Internet tab, enable the Mode 4: Web Proxy Server mode, enable the Change System Settings option; specify the proxy server’s address, as teacher_computer_name:proxy_port_number, for example, teacherpc:8080. Click OK to apply changes

When the Change system settings option is enabled, the student module will enable the proxy server in the operating system settings automatically. You can also change proxy server settings manually at any moment, on each student computer using standard operating system tools (for example, for Windows 11 in Start -> Settings -> Network and Internet -> Proxy).
The Web Proxy Mode assumes that all web traffic that is consumed or generated by students is sent through the proxy server computer (i.e. the teacher computer), this also means that students will not have access to Internet when the teacher computer or the proxy service is turned off.
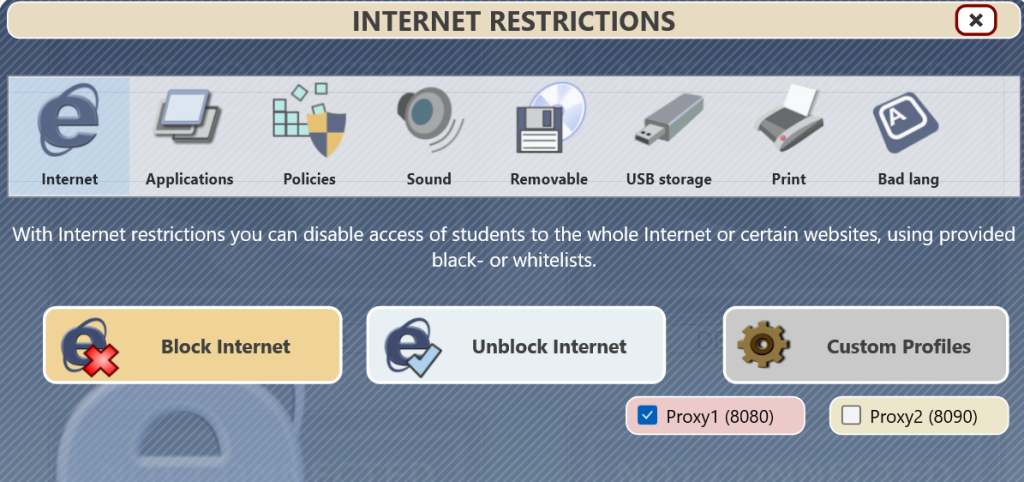
When the proxy server is enabled, the Restrictions tool in the Internet Restrictions section will contain additional check boxes Proxy 1, Proxy 2, Proxy 3


to apply a profile or restriction to the specific proxy port, just check the respective check box.
3. To disable the proxy server mode on student computers, please select them in the teacher console, click the main menu command N – Options – Client Options; on the Internet tab, enable the Uninstall Internet Control Engine action and click OK.
Disable the service in the teacher module settings (N – Options – Options); on the Web Proxy page.


